Wednesday, January 25, 2012

FO: Items for Baby!

So for those of you who don't know, I have an extremely large family. Anyone who's parents were baby boomers might be able to relate to my situation. On my fathers side I have 9 aunts and uncles, on my mothers 8. Then add all their spouses, and children, plus grandparents and grand aunts and uncles. That's a lot of people! Some of my oldest cousins are starting to become grandparents! Most of my cousins on my fathers side are in their mid twenties now, at least the first half of them. I'm somewhere in the middle of the pack. So that means for the past few years between my cousins and I there have been lots of weddings!! So now the next phase has begun, queue the babies.

My oldest cousin got the ball rolling before all of us and his little boy is around 8 or 9 months old now. Then the other day I got an invitation to my cousin Sara's baby shower. I had to make something of course! I've been itching for a chance to make some adorable baby items for awhile now! I know not everyone has someone they know who will make a lovely baby afghan for them, and I think everyone should have one! Of course chances are equal she might end up with 5 but then who has too many baby blankets? So anyways that's my story and I hope Sara doesn't read this blog because she'll be ruining her surprise. Don't tell ok!


First I made a quick hat and booties using this pattern from Ravelry found here: http://www.ravelry.com/patterns/library/crochet-baby-warmers-set

I used some discontinued Berroco Lullaby yarn that I acquired and this was the perfect use for it! The nylon fibers make this hat so stretchy and soft! Perfect for a little baby! Its not as durable and washable as acrylic but for a hat and booties lets hope they don't get as much wear and tear. The pattern says it should fit all the way up to one year. It might be a little loose for a newborn but I'm sure it will fit for a majority of that first year! It's absolutely precious.


And finally my One-Pound baby blanket. Found here: http://www.ravelry.com/patterns/library/one-skein-baby-blanket

I made this from a 16oz skein of Caron International in cream. At first I was just going to leave it yellow but I couldn't resist adding the blue so I modified the border and added a puff stitch border instead. I think it turned out lovely. The worsted weight yarn and the cross-dc pattern helped this blanket come together pretty thick. It doesn't drape as well, but I can see it being a great blanket for when the baby plays on the floor. It should provide lots of padding! Since I kept it simple I was able to finish the blanket in 3 days, because the shower is only in a few weeks. I didn't want to start something too complicated out of fear that I wouldn't finish in time! Along the way I did find several patterns I will definitely have to make later when I have more time. 

You can find my Ravelry Projects here:

Thursday, January 19, 2012

WIP: Red Trefoil Throw


Ok I'm holding myself accountable now! Its been about 2 years since I started this throw. I started when I moved in with my boyfriend, who is now my husband, in an attempt to add some decor to his lovely bachelor pad. He has these leather couches which I have to admit are very nice, real leather, and comfy. But they are just so dang masculine. So I thought maybe red would go well with them to give them some color. I added the red pillows and put some red curtains up in the living room window. Then I though oh I'll make a nice throw with a simple pattern that wont take long, it will be my first blanket so I can be proud. Two anniversaries and a wedding later....I'm probably about half way through. But I'm going to finish it now! That's what matters right?

I'm using Caron Simply Soft as you can see in the picture, in beautiful Autumn Red. This yarn is great, I bout six skeins of it for probably less than $20. Its so soft and shiny and looks like silk! But its 100% acrylic, I don't know how they do it. I love to use this yarn when I can especially for big projects.

The pattern is free from Red Heart and you can find it here: http://www.redheart.com/free-patterns/trefoil-throw

Nothing against the Red Heart yarn...they just don't sell a very good selection where I live. I would like to try the Eco Ways sometime, but all they have here is Super Saver.

So I'm going to try and finish this up sometime...I don't have any other started projects at the moment so I'm going to try and hold off on anything else until this is done. We will see...I still have to make something from Pinterest by the end of the month...but maybe I'll bake something this time.

Tuesday, January 17, 2012

FO: Squid Hat


So my friend finally got his squid hat today! He has been wanting one for awhile! He was really psyched to see this today. I'm glad he liked it. Hes just the kind of person to wear something like this too. He likes hats so I'm glad I could add one of my creations to his collection. He works with my husband at a video game company so he'll fit right in.

I got the pattern from Etsy as mentioned in my previous post: Squid Scoofie

Although I will note that I found the pattern did not exactly turn out like in her pictures. I believe that an I sized hook was too small, and if I were to ever make another one again I would probably try something bigger. The tentacles and hood came out smaller and less "chunky" than in the picture. Even though I used the same Berroco Vintage Chunky yarn as stated in the pattern. But oh well. Also I didn't add suckers on each tentacle because I don't have that kind of patience to make lots of little round circles. Making 12 for the clubbed ends was plenty for me :P

In the end I have to say it turned out good though. And judging from his reaction upon receiving the hat I don't think he cared haha.

Life, As I know it: Do you love Pinterest?! Join our Challenge!

Life, As I know it: Do you love Pinterest?! Join our Challenge!: It just totally rocks! Are YOU loving this Virtual pinboard as much as me? I thought so. A couple of weeks back at 3 o'clock in th...

So I've decided to join the Pinaddicts challenge! Since I am now a recent Pinaddict! I'm excited to search through boards and look for some fun things to make. This way I can expand my "craft collection" even further. You can do anything, baking, cooking, sewing, paper, anything as long as its a pin on Pinterest and you made it!

Go here to follow my pins: Tricia McIntosh

Check out the blog post I mentioned to join yourself!

Thursday, January 12, 2012

Wedding Crafts: Memory Box

Well since the blog is called Craftopoly I thought it might be a good time to share some of my other crafty projects. So first is a project that was really special to me. For my wedding last November (on 11-11-11) in Kauai, Hawaii I did a few DIY projects, to save money, and because I wanted to have some personal touches. One of them was this nice little box for our guests to place their cards in.


I documented my process a little since it took me a few weekends to complete, so I'll go through it for you. Everything I used can be purchased at your local craft store. The box I used had hinges and a latch which I took off before painting. I put the hinges back on later, but left out the latch.


First I started out by painting the whole thing in dark blue. Then I dry brushed over that with light blue, white, and aqua, that I diluted with a little water. That's what gave it the weathered and multi-colored look. I liked the way that turned out because it really showed off the wood grain. I used acrylic craft paint and I made all the colors myself with only a bottle of blue, red, yellow, and white.


For the letters I took scrap booking letter stickers, (the kind that don't have white space around them) and placed them on the edge. Then I painted the edge with about 3 or 4 coats of white. After it dried I peeled off the stickers with a knife and ta-da! Perfect letters!


I also added the date on the back. The paint did bleed a little under the stickers, but I thought that added to the rustic look of it.


Then I painted the flowers on. I used a computer print out and some white carbon paper to trace an outline on the box and then I painted it in with some very small angled brushes.


I did the flowers on top the same way, and I also painted a border to extend the white a little onto the top because the white edges bled a little.

I also painted the entire inside of the box white, and added ribbons to keep it from opening all the way and tipping over. (I'll add some pictures of that when I get a chance)

So there it is! I'm very pleased with it! I loved doing this too. I might even make a few more in the future if I ever feel inspired again! Maybe for a friends wedding or something! It also serves a purpose after the wedding too because its so personalized. We are using it to keep all our keepsakes from the wedding, like my garter and the cork from the champagne. I guess its like a "memory" box now. We can open it up later and remember our day together :D

Wednesday, January 11, 2012

New Pictures!

It was so sunny and wonderful outside today that I had to take some pictures with my newly finished projects. You wouldn't believe it was January from the weather we have been having here in Texas! Its wonderful!


And my lovely husband :D

Tuesday, January 10, 2012

Ana and Mark's Hats


Look at my lovely Sister-in-law and her boyfriend wearing the hats I made them for Christmas! I'm so happy they like them and they look great on them! Making items for other people is so rewarding! It's probably why I haven't sold anything! Since they live in Boulder, CO I'm hoping they will get good use out of them. 

This is the same cable hat and puff hat mentioned in my previous post. 

Raspberry Beret


Here is the lovely beret I made yesterday. This is the same sale yarn from before that I used to make the pink scarf. This one was the only skein left and I just couldn't leave it behind! I love the beautiful raspberry color. It was (almost) the right amount of yarn to make this hat.

I used a very interesting and new technique to create this hat, I really enjoyed it. Basically the reason why this hat looks the way it does is because this is actually the "wrong" side of the crochet. But using this technique the "wrong" side is actually the "right" side! It goes to show you that there are no hard rules for anything right! I actually half double crocheted through the back loop and the back horizontal bar of the hdc and it creates this look! On the inside there is a line on each row where the front loop was skipped, which might also look cool but in this case I liked this side better.

I found the pattern on Ravelry here: http://www.ravelry.com/patterns/library/sun-ray-slouch and she explains the technique really well in the pattern.

I did find that the yarn I used, which was a DK just like the pattern says, might have been a little to small. I wasn't able to quite fit in the 5 rows of brimming out of my 127 yrds, but I just about made it. I was afraid at first that the hat would be too small but once I blocked it then it got a lot bigger. So I think it will all be ok in the end! I just think my hat will be a little more lacy than hers. Now that I think about it my yarn might be a DK but a baby DK? I'm unsure if that even exists and if there is a difference. But regardless I'm sure different yarn types always end up differently.

I'll have more pictures up once it dries :D

Monday, January 9, 2012

Pink Cashmere Scarf


I'm really loving this scarf! I bought this really nice cashmere yarn at the after Christmas sale at Holley's Yarn Shoppe here in Dallas. They only had three skeins left that were the same color so that's how I ended up with this lovely pink. I wouldn't normally pick pink but I'm glad I did because this scarf is absolutely adorable. The pattern and the yarn I used give it a nice stretch so it can wrap around your neck and keep you nice and warm! And of course I was so happy to get a fine yarn like this for 40% off it was really a steal! It's not very often I get to work with something this nice so this project was really special.

I found the pattern on Ravelry here: http://www.ravelry.com/patterns/library/urban-shells It seems to be quite the popular pattern! I love seeing all the different twists people put on it. Me, I just left it the way it was written, and I think it turned out very nicely. Ravelry is perfect when you have a few balls of stash yarn to use up, because it lets you search based on the amount of yarn needed for the pattern! That way you can see what you can make with what you have. Its really useful because before I always found myself wondering...oh I wonder if this will need more yarn. You don't want to get half way through your project and run out! Especially when using clearance yarn! 

You can find the details of this project on my Ravelry here: http://www.ravelry.com/projects/Firecracker197/urban-shells


Sunday, January 8, 2012

Squid "Scoofie"


Source: etsy.com via Tricia on Pinterest


Even though I found this on What Not to Crochet my friend has been wanting a squid hat for awhile and now that I've seen this I'm really inspired to make one...now I just need to decide if I want to just buy the pattern or just figure it out myself...I guess I could always see how my try works out and if it goes horribly I can buy it then :P The idea of making it a hood/scarf is really cool though, my first thought was to make it kind of like a hat but the way this looks seems like it makes more sense. The creator of this on Etsy calls them "scoofies" haha how cute! Buy the pattern here: Kraken of the Sea

Also on a side note I finally got a Pintrest account today! I'm so excited! I love this site and I can already see myself going on it waaay too much. But what could be better than sharing pictures of adorable crafts! There's also delicious looking pictures of food and all sorts of inspiring things! I think I will definitely have plenty of project ideas now!

Thursday, January 5, 2012

How To: Finger Crochet


Now isn't this great? I might have to try this some time, that blanket looks so warm!

Wednesday, January 4, 2012

Spiral Motif Shawl


Its finally done! It didn't actually take me that long really...about 3-4 days over the span of a week during my holiday. Its amazing what you can get done when you have nothing else to do! I have been excited about this piece since before I started it and I'm so happy that its done!!

I got the pattern from this wonderful book:


And I was so happy to get it! This was one of the books I had on my list of MUST HAVES for Christmas presents. Thank goodness for amazon wish lists! I had the yarn all ready to go on Christmas day ready to get started on this baby!
Here is a picture from when I was blocking it so you can get a better idea of the shape.


It's basically worked like a pyramid, starting with a row of 4 motifs and adding one each row. The awesome thing about Kristin's book though is that the whole technique of crocheting the peice is seamless! So you don't have to sew them together at the end you just join them all together as you go making multiple motifs all at the same time. Its wonderfuly brilliant! It's just the kind of thing I love about crochet, I love to do interesting patterns that come together in a challening yet creative way. In the end you get something totally unique. Her whole book is full of patterns using this same seamless motif technique and I can't wait to do some more! She has everything from shawls, to blankets, to scarves and hats!  

So there it is! I hope you like it as much as I do! Eventually I'll have to take some better pictures than this but my iPhone will have to do for now!

See the details of this project on Ravelry: http://ravel.me/Firecracker197/blshs

Monday, January 2, 2012

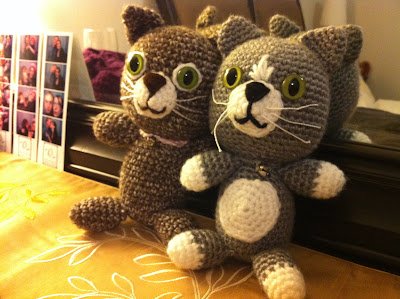
Cat Amigurumi


Here's the two cuties I made for my husband as a Christmas gift. We both love our cats and these were just too adorable to not make! They are meant to look just like our cats Lucky, and Charm. I think I did a pretty good job! Lucky is brown with white stripes so I just used a multi-colored yarn with the same type of colors. The cat eyes I bought at the craft store and the whiskers I added really made these look perfect!

I got the pattern from Ana Paula's Amigurumi blog here: http://amigurumipatterns.blogspot.com/2007/05/cat-mouse.html

She has tons of super cute amigurumi patterns for sale in books and for free on her blog. Whenever I feel like making an adorable project that is the first place I look!

You can view my Ravelry project here: http://ravel.me/Firecracker197/cm

Ruffle Scarf Project

Another recent project to show off!


This is a lovely ruffled mini-scarf I made using one skein of baby light weight yarn. I really enjoyed making this scarf and it was my first project that I sort-of created myself. I couldn't have done it though without the hundreds of creative patterns available in this book:


This book was an impulse buy on amazon while I was buying Christmas presents for my family...hey you have to get at least one thing for yourself right? I'm so glad I bought it and I definitively recommend it for anyone that crochets! It has so many creative borders to use for all kinds of things, and I made this scarf specifically so I could use one of these borders and I think I picked the perfect one! The way this border increases the number of chains on each row makes for a beautiful ruffled border. The lighter weight yarn also lent well to the lacy look of it. Of course the baby soft yarn also made it cozy! This scarf can be perfect for all seasons and since I recently cut my hair short I needed it to keep my neck nice and warm. 

You can purchase this book on amazon for a great price and the border I used was #40. 

You can view my project details on Ravelry here: http://ravel.me/Firecracker197/wrs

New Project! Cable Hat

Hello followers! 


I know I am not the best about updating this blog very frequently but I have been bitten by the crochet bug as of late so I have some projects to post! This first project is a hat I made for my new husband. :D Pictured here, along with our handsome cat Charm. 


The cables on this hat were really fun! They seemed pretty complicated at first but once you understand how they work its pretty simple. It was really fun to learn how to do cables and it makes me want to go put cables on everything! The combinations of twists and turns are limitless and I image you can be very creative with how you use them! This is one technique I'm adding to my bag of tricks and I hope to use it again soon! I feel like I'm learning more and more about crochet with every project. I hope to be writing some of my own patterns soon!


I found this pattern on Ravelry here: http://www.ravelry.com/patterns/library/cable-hat
She has lots of very popular hat designs on her site and they are all available for free! I loved her patterns so much I also made another cable hat and her puff stitch hat for my sister-in-law and her boyfriend for Christmas gifts. (picture pending)


You can see my Ravelry Project here: http://ravel.me/Firecracker197/ch